Mastering Bushcraft Tarp Shelters: Simple Setups That Work
When you’re out in the wild, a tarp is one of the most versatile pieces of gear you can carry. It’s lightweight, easy to pack, and can be set up in countless ways. Over time, I’ve learned that a solid tarp shelter can make or break your comfort and safety in the backcountry.
Whether you’re avoiding a rainstorm, getting some shade, or keeping bugs off at night, knowing how to set up a tarp is essential. Here’s what I’ve found works best, drawn from personal experience and mistakes along the way.
Choosing the Right Tarp
Before you even start setting up, picking the right tarp is key. You don’t need to go fancy here, but size and material matter. I tend to go for something in the 10×10 foot range, which is big enough for most solo or small-group shelters without being too bulky.
Lightweight nylon tarps with reinforced corners and tie-out points are my go-to. They’re durable and water-resistant, which you’ll need if you’re dealing with wet conditions. Avoid cheap plastic tarps—those can tear easily and won’t hold up long-term.
Setting Up a Ridge Line
The first thing you need to know about setting up a tarp shelter is how to run a good ridge line. This is basically the backbone of most tarp shelters. Find two solid anchor points—trees are best—about 10 to 15 feet apart. Use a strong cord, like paracord, to string between them at shoulder height or higher, depending on the type of shelter you’re building.
Keep it tight. This ridge line will hold up your tarp and provide the structure. You can also use a single tree and your trekking pole if there’s no second tree. Just tie one end of the ridge line to the tree, stake the other end in the ground, and support it with your trekking pole.
A-Frame Shelter
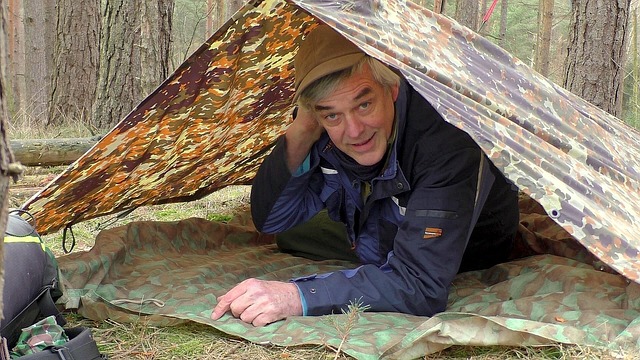
The A-frame is my bread and butter when it comes to tarp shelters. It’s simple and gives good coverage from rain. To set it up, drape your tarp over the ridge line so it forms two sloping walls on either side. Stake out the four corners to keep it taut, and you’re done.
If the weather is looking rough, you can angle one side lower to the ground to block wind and rain. If it’s warm and dry, keep both sides higher for better airflow. I like this setup because it doesn’t take much time, and it’s easy to adjust depending on conditions.
Lean-To Shelter
If I’m looking for quick shade or just a break from wind, the lean-to is my go-to. You only need one side of the tarp elevated, so it’s good when you’re tight on space. I usually set it up by tying one edge of the tarp to the ridge line, then staking down the opposite edge to the ground at a steep angle.
This is a great option if you’re camping near a fire, too, because you can position the open side facing the fire to reflect heat toward you. It’s not the best for full protection in bad weather, but it’s fast and easy, which makes it perfect for short stops or fair-weather nights.
C-Fly or Flying V Shelter
The C-fly is a bit more technical but well worth learning for wetter conditions. This shelter’s strength lies in its ability to channel water away from your sleeping area. I set it up by tying one corner of the tarp to a high ridge line, then staking the opposite side low to the ground at an angle.
The remaining two corners can be staked down or adjusted to control airflow and visibility. This shelter shines in rainy conditions because it directs water runoff away from where you’re sleeping. It also gives you enough room to sit up comfortably while staying dry, which is a huge plus when you’re stuck in camp during a downpour.
Flying Diamond Shelter
For those who don’t mind getting creative, the flying diamond shelter is one I turn to when I want better views or need to deal with uneven terrain. This one’s all about positioning. Instead of aligning the tarp edges with the ridge line, you stake down one corner and tie the opposite corner to a high point like a tree or trekking pole.
You’re left with a diagonal wall that gives you both shelter and an open side to enjoy the view. This setup works well when you want a combination of protection and openness. I use it often for midday breaks or stargazing nights when weather isn’t an immediate concern.
Securing Your Shelter: Knots That Matter
Knowing a few knots can make or break a shelter setup. You don’t need to be an expert, but here are two knots I use on nearly every trip: the taut-line hitch and the bowline.
The taut-line hitch is adjustable, making it perfect for tightening guy lines. You’ll use this one on corners and sides to keep your tarp taut. The bowline, on the other hand, is great for securing the ridge line or anchoring your tarp to trees or stakes.
Once you learn these, you won’t have to worry about your tarp sagging or blowing loose in the middle of the night.
Adapting to the Environment
No two spots are the same in the wild, and sometimes you’ve got to get creative. When there are no trees, I’ll use trekking poles or even sticks to form makeshift supports. In rocky terrain, I’ve had to use boulders as anchor points instead of stakes.
Be adaptable, and don’t be afraid to experiment with new setups depending on your surroundings. One thing I always watch out for is water drainage. It’s easy to forget that water will pool in low spots, so I make sure to set up my shelter on a slight incline or divert water away with small trenches when needed. It’s not fun waking up in a puddle.
Final Thoughts on Bushcraft Tarp Shelters
At the end of the day, the key to mastering tarp shelters is practice. The more you set them up, the better you’ll get at choosing the right style for the conditions. I’ve spent enough nights fiddling with guy lines in the rain to know that efficiency matters.
And trust me, the moment you get your shelter right before a storm hits, it’s one of the best feelings you’ll have out there. Keep it simple, stay flexible, and learn from every trip. Your tarp is a tool, and like any tool, the better you understand it, the more effective it becomes in the wild.
You might as well be interested in
-

Bushcraft Survival Shelters: How to Build a Safe Haven in the Wild
You might as well be interested in
-

Building a Bushcraft Shelter with a Fireplace: Stay Warm and Safe in the Wild
Building a Bushcraft Shelter with a Fireplace: Staying Warm in the Wild When you’re spending time in the wilderness, staying warm is one of the…
-

Bushcraft Shelters for Long-Term Living: Building Durable, Lasting Setups
Bushcraft Shelter for Long-Term Living: Building Durable, Lasting Setups When you’re thinking about staying in the wild for more than a few days, your shelter…
-

Bushcraft Shelter Ideas: From Simple Lean-Tos to Rugged Long-Term Setups
Bushcraft Shelter Ideas: Building Practical, Reliable Shelters in the Wild When you’re out in the wilderness, finding the right shelter can mean the difference between…
-

Bushcraft Shelter Build: How to Construct a Reliable Wilderness Shelter
Bushcraft Shelter Build: Constructing a Solid Shelter in the Wild When you’re out in the wilderness, one of the first things you need to think…
-

Bushcraft Log Cabin: How to Build a Long-Term Shelter in the Wild
Bushcraft Log Cabin: Building a Long-Term Shelter in the Wild Building a bushcraft log cabin is one of the most satisfying and practical ways to…
-

Building a Bushcraft Dugout Shelter: Guide to an Underground Camp Setup
Building a Bushcraft Dugout Shelter: Your Underground Survival Home When you’re thinking about long-term survival or a more permanent wilderness camp, a bushcraft dugout shelter…
-

Bushcraft Camping Tents: Durable Shelters Built for the Wild
Bushcraft Camping Tent: Choosing the Right Shelter for the Wild When it comes to bushcraft camping, the shelter you choose is just as important as…
-

The Art (the Mess) of Bushcraft Tarp Shelters: Simple Setups That Work
Mastering Bushcraft Tarp Shelters: Simple Setups That Work When you’re out in the wild, a tarp is one of the most versatile pieces of gear…
-

Bushcraft Shelters: How I Build for Survival in the Wilderness
When I head out into the wilderness, having the skills to build a bushcraft shelter is crucial. In an unpredictable environment, where the weather can…


